

.webp)
.webp)
7 Days Lemosho Route Kilimanjaro Hiking Quest
This hiking quest promises not only the thrill of conquering challenging terrains but also the unparalleled satisfaction of standing atop Uhuru Peak. Join us as we delve into the day-by-day exploration of this epic adventure. This quest isn't just about reaching the summit; it's about embracing the journey, immersing yourself in varied landscapes, and pushing your limits. Fuel your aspirations and witness the world from the rooftop of Africa.
Tour highlights
- Arrival Day : Kilimanjaro Airport – Moshi/Arusha
- Day 1 : Moshi/Arusha to Londorossi Gate to Mti Mkubwa (Big Tree)
- Day 2 : Mti Mkubwa – Shira 2 Camp
- Day 3 : Shira 2 Camp – Lava Tower – Barranco Camp
- Day 4 : Barranco Camp – Karanga Camp
- Day 5 : Karanga Camp - Barafu Camp
- Day 6 : Barafu Camp to Uhuru Peak Back to Barafu Camp then to Mweka Camp
- Day 7 : Mweka Camp to Mweka Gate to Moshi
Itinerary
Day 1: Moshi/Arusha to Londorossi Gate to Mti Mkubwa (Big Tree)
Embarking from Moshi or Arusha, your hike commences at Londorossi Gate. Through lush rainforests, the trail leads to the serene Mti Mkubwa, where colossal trees set the stage for the days ahead. • Distance: Approximately 15 km • Duration: 6-7 hours • Temperature: 15°C - 25°C • Landscape: Enchanting rainforest, diverse flora and fauna.
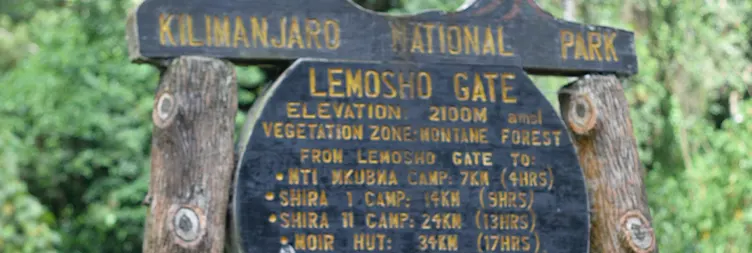
Destination: Londorossi Gate To Lemosho Gate To Big Tree (Mti Mkubwa) Camp
Accommodation: Big Tree (Mti Mkubwa) Campsite
Meals & Drinks: Breakfast, Lunch, Dinner, Drinking water
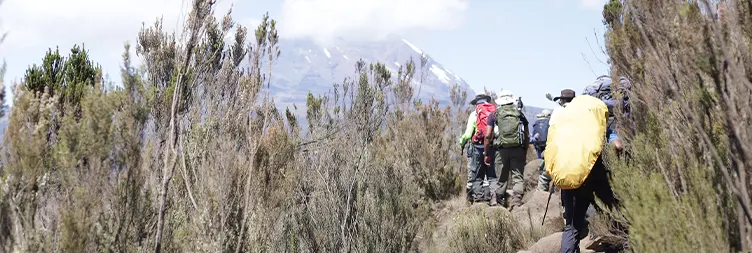
Day 2: Mti Mkubwa – Shira 2 Camp
Ascending to the Shira plateau, the scenery transforms into panoramic views of surrounding peaks. Each step forward unveils the grandeur of Kilimanjaro. • Distance: Around 10 km • Duration: 5-6 hours • Temperature: 10°C - 20°C • Landscape: Alpine meadows, open moorlands.
Destination: Big Tree (Mti Mkubwa) Camp To Shira 1 Camp
Accommodation: Shira 2 Campsite
Meals & Drinks: Breakfast, Lunch, Dinner, Drinking water
Day 3: Shira 2 Camp – Lava Tower – Barranco Camp
The day introduces the iconic Lava Tower, a strategic point for acclimatization. Descending to Barranco Camp, the unique Barranco Wall becomes a focal point. • Distance: Approximately 12 km • Duration: 6-7 hours • Temperature: 5°C - 15°C • Landscape: High alpine desert, lava formations
Destination: Shira 2 Camp To Lava Tower To Barranco Camp
Accommodation: Barranco Campsite
Meals & Drinks: Breakfast, Lunch, Dinner, Drinking water
Day 4: Barranco Camp – Karanga Camp
Tackling challenging terrain, the Barranco Wall offers exhilarating views. Karanga Camp, nestled in a scenic valley, becomes your haven for the night. • Distance: About 5 km • Duration: 4-5 hours • Temperature: 5°C - 15°C • Landscape: Alpine desert, glacial valleys.
Destination: Barranco Camp To Karanga Camp
Accommodation: Karanga Campsite
Meals & Drinks: Breakfast, Lunch, Dinner, Drinking water
Day 5: Karanga Camp - Barafu Camp
The landscape becomes rugged as you approach Barafu Camp, your last stop before the summit push. • Distance: Approximately 4 km • Duration: 3-4 hours • Temperature: 0°C - 10°C • Landscape: Alpine desert, rocky terrain
Destination: Karanga Camp To Barafu Camp
Accommodation: Barafu Campsite
Meals & Drinks: Breakfast, Lunch, Dinner, Drinking water
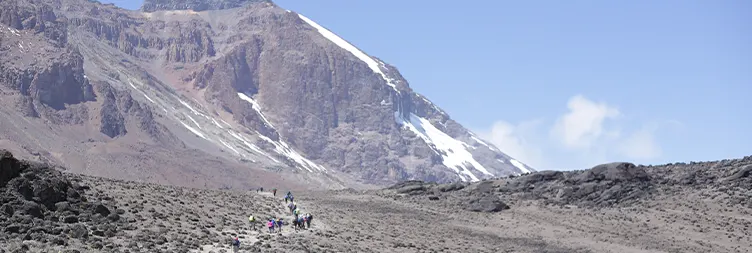
Day 6: Barafu Camp to Uhuru Peak Back to Barafu Camp then to Mweka Camp
The summit day arrives, with an early start for the ascent to Uhuru Peak. After savoring the triumph, descend to Barafu Camp, then further down to Mweka Camp. • Distance: 15 km ascent, 10 km descent • Duration: 14-16 hours • Temperature: -10°C to -5°C at the summit • Landscape: Glacial and snow-covered summit, rocky descents.
Destination: Barafu Camp To Uhuru Peak To Mweka Camp
Accommodation: Mweka Campsite
Meals & Drinks: Breakfast, Lunch, Dinner, Drinking water
Day 7: Mweka Camp to Mweka Gate to Moshi
The final descent through lush rainforests concludes at Mweka Gate, where a well-deserved certificate awaits. • Distance: Approximately 10 km • Duration: 3-4 hours • Temperature: 10°C - 20°C • Landscape: Rainforest, vibrant flora
Destination: Mweka Camp To Mweka Gate
Meals & Drinks: Breakfast, Lunch, Drinking water
Price Includes
- Sleeping bag or bed linen
- Rental vehicle
- Porterage
- Rescue fee
- All activities mentioned (unless clearly labeled as optional)
- Meals (as specified in the day-by-day description)
- All accommodation mentioned (unless clearly labeled as optional upgrade)
- Camping equipment (only sleeping bag/bed linen may be listed as excluded)
- All transportation mentioned (unless clearly labeled as optional)
- All Taxes/VAT
Price Excludes
- Bath towels
- Climbing gear
- Roundtrip airport transfer
- International flights to/from the start/end of the tour
- Additional accommodation before and at the end of the tour
- Tips: tipping guideline
- Personal items
- Government imposed increase of taxes and/or park fees
Frequently Asked Questions
Altitude sickness can occur. Our itinerary includes acclimatization days to minimize risks.
The best time is during the dry season, typically from late June to early October.
Yes, porters are provided, and the weight limit for personal gear is 15 kg.
Purified water is provided daily. You can also bring water purification tablets
Comfortable tents are provided for camping, equipped with sleeping bags and mats.
While no specialized training is required, physical fitness and stamina are crucial.
Basic toilet facilities are available at campsites; however, be prepared for rustic conditions.
Our experienced guides are trained in first aid, and emergency evacuation plans are in place.
Charging facilities may be limited. It's advisable to bring a portable charger.
Yes, travel insurance, including coverage for high-altitude trekking, is mandatory.